Thursday, March 12, 2015


There is a 2 day event on Jane.com for 2 days!!! Princess inspired t-shirts and dresses for only $18.50!! 


Here is what is up for grabs!  


Go JOIN!!!!  Only 2 days!!! CLICK HERE! 

After you shop, go to our facebook page and meet our face of Designs by Meghna for March!
The beautiful Marley Belle!


Follow us for sneaks, deals and sales!


Saturday, February 28, 2015

$1 Auction!!  This weekend!!


Members ONLY!!! Click HERE to become a member!!!

Join us this weekend in our Facebook Group for our $1 auction!
Don't miss out!  Become a member TODAY!!!

Follow us for updates on sales, sneaks and more!

Tuesday, February 17, 2015

2 Days Only!!


Come join us at our event on Jane.com!
 Grab your gorgeous Boutique Dress for only $18.50 HERE


So many designs to choose from!  Hurry!  They won't last long!!

Don't forget to follow us for updates, sneak peeks, and deals!


Saturday, February 14, 2015

Princess Inspired Dresses on Jane.com for 6 days!!

What little girl doesn't love to dress like her favorite princess?  We have princess inspired dresses listed now on Jane.com! 


Do you want to build a snowman?


It doesn't have to be a snowman!

Ana and Elsa have taken OVER!  Every little girl wants to dress like them!  Get your Ana and Elsa inspired dresses on Jane.com for $19.99 today!  This sale only lasts for 6 MORE DAYS!!!!

Don't forget to follow us for updates on sneak peaks and deals!


Saturday, February 7, 2015


Good evening to all our Designs by Meghna fans!!!!  

Did you check out our LIVE event happening on Zulily.com that is happening RIGHT NOW??
CLICK HERE  to join the event!!!

Here are just a few previews of what can be seen at the event!


Don't forget to follow us for updates on sneak peaks and deals!

Facebook - www.facebook.com/designsbymeghna

Instagram - www.instagram.com/designsbymeghna

Wednesday, February 4, 2015

Who's ready for our NEW spring & summer line?!?!?!?!

First, our deepest apologies for not having blogged in quite awhile!  Well...we are BACK and ready to rock!!!  Woohoo!  I hope this blog reaches all our fans in good health and lots of new things for the new year! 

On Saturday, February 7th, our NEW line will be featured on Zulily!  We will post the url to that event on Saturday!  So stay posted!!!

With that being said...who's ready to see sneaks of our NEW spring and summer line? 
*GASP* I know I'm ready!  


 How sweet are these dresses!!!  These are just SOME that we will be featuring in our new line!
So soft and comfy and ready for the beautiful spring and summer days!  

Want to go a little more BOLD?  A little less soft like above?  Check these styles out!


Again, these are just SOME of the styles that we will be offering at Designs by Meghna!  I bet you can't wait to see the rest!  So many more!!!!

And for those little misses who prefer to wear pants, we will be offering leggings!! Don't forget to check back for other colors as well!

And how about some sparkle for your summer?  Let your shimmery princess sparkle in our new sparkle shorts!  Shown here in Silver and Pink, but available in other colors too!  

So stay tuned for our launch on Zulily on Saturday the 7th!!!


Don't forget to follow us for updates on sneak peaks and deals!

Facebook - www.facebook.com/designsbymeghna

Instagram - www.instagram.com/designsbymeghna


Friday, January 11, 2013

Suri's 1st Birthday

I have been wanting to blog about my daughter's 1st birthday forever, so here goes.

I know a lot of people thought it was over the top and crazy (including my husband) when I started planning it - and without my friend Meghan who helped so much, I would have never been able to pull it all off! I loved everything that we did, all the details that we put into it, all the arguments I had with my husband about being extravagant, everything! All the kids and our guests LOVED it!

We had a one year photo shoot for Suri - She was tired and cranky but the photographer (Pandya Photography, NJ) made it work and the pictures came out amazing! We wanted to use the pictures form the shoot for our invite so this was on top of our list to get done.


We decided to go with the "One year in a Flash" theme and decided to use pinks and blues for colors! Once we had the theme down, the next on our "to-do" list was invites! We had Gwen from GwenMarie Designs design the invite for us.  She was extremely patient with us and made all the changes we requested! She designed the invite, insert and the return label for us.

The invite included an insert that asked the guests to bring something to add to Suri's time capsule, which she would open on her 18th birthday! This was a great success, guests were really creative with what they added to the time capsule box.


Next on the list was decor.  Having nailed the color down, it was easy enough to figure out what we wanted to do in terms of decor.  We started with getting a sign for the yard,  found this at Party City for $5.99, worked so well with out color scheme.  Meghan and I worked on the wreath as well! I loved how it set the tone for the party, colors and all!


We found an easy, inexpensive way to make a personalized wreath.  We were able to find all the supplies at Michaels, less than $15 to DIY.  I have a post on the blog on how to make it, it's simple and easy and can be personalized.

For entertainment, we had two fun things.  We set up an open style "photo booth" or like our photographer, One Rock Studio,  liked to call it, a "photo fun station." Michael, the owner was generous enough to bring lots of fun photo props for the guests to use.  He even created an amazing personalized frame that would directly print on the picture, which was available for the guests to take home.  I also bought frames that I used as favors from Ikea (.99c each), guests were able to put the pictures from the photo station into the frame and take them home as a memorable favor!


Additionally, we had an amazing face painter/balloon twister come out to entertain the kids.  She was lovely, extremely professional and did a great job with her wonderful art for all the kids! 

We also had Tyler Rieth from Tyler Rieth Photography take pictures to capture the fun moments of the party! He did an amazing job and many of his pictures are displayed all over this post.  He also did a blog feature of the party on his blog.

Here is some decor from the party-

This was the candy table that we decorated with all pinks and blues.  I found most of the candy and scoops from Party City and bought a few from the dollar store.  I bought almost all the candy dispensers from Michaels.  We had these adorable cookies that we had a local baker make for us, she is absolutely amazing and you can find some of her work here.  I borrowed the table runners with "s" from a friend who had used them for her wedding, the colors went perfectly with our theme.


The desert table was on display as soon as you walked through the front door.  I purchased the ruffle fabric from ebay, i found it the cheapest there, I have since gotten a dress and a skirt make for Suri from the fabric - makes for a great memory and I think the fabric wasn't a complete waste. I bought the pompettes from TheFlairExchange on Etsy and we glue dotted them onto the fabric.  We ordered the cupcakes, truffle pops and the cake from a local bakery, they did a spectacular job with the colors.  We also decorated all the cupcake stands with pinks and blues to keep with the color scheme and cut out cupcake picks and name tags for all the desert.


 We set up the time capsule on the main floor, I created the box using two cardboard boxes, created a hole on the bottom box to fit the smaller top box and a slit on the top to insert the letter, cds and other memoriables from the guests and wrapped it up with wrapping paper, ribbons and some flowers - easy and cheap to make at home and looked great!  I added the "one" blocks from the photo shoot onto the table and put out some pens and paper for anyone that forgot to bring something for it. 

We had the majority of the entertainment in the basement. As soon as you walked down the steps, I had a decal with her name on the wall, we used pictures from Suri's first year to create photo banners going down the stairs. We decorated the space with simple balloons and banners.


Here are some pictures of some fun moments of the party! I enjoyed planning this birthday party for Suri and know that all the kids and guests at the party had a wonderful time.  
Please note that all images on this blog are the property of the photographer or us.  Please do not copy or use these pictures for any purpose without permission. 

Sunday, October 14, 2012

Flourless Peanut Butter Kiss Cookies

Serves: 18 
Cooking and Prep Time (approx.): 30 mins
 
Ingredients:
1/3 cup confectionery sugar
1/3 cup brown sugar
1/3 regular white sugar
1 cup peanut butter
1 egg
18 Hershey kisses, unwrapped

Directions:  
-Preheat oven to 350 degrees F. 
-Combine all 3 sugars, peanut butter, and egg in a large mixing bowl 
-Shape into 1 inch balls and place on ungreased cookie sheet. NOTE: If dough is too sticky, refrigerate 1/2 hour or until easy to handle. 
-Bake for 10 minutes. Remove cookies from oven. Press a chocolate kiss into the center of each warm cookie, immediately.
 
These delicious cookies are flourless and melt in your mouth! While saving the cookies, use air tight containers and if possible, line containers with plastic wrap to keep them fresh
 
Note: I take no credit for coming up with this recipe, I only tweaked it to my taste.  Please follow this link for complete details of this recipe on AllRecipes.com.

Sunday, September 9, 2012

Halloween Wreath

I created this wreath for Halloween using shabby flowers and some Halloween decor I found at Michaels! It took me 20 mins to make and I love how adorable it looks!

Cost: $15 approx
Time: 20 Mins

You will need (I bought everything at Michaels):
1 Wreath
1 Burlap
Scissors
Shabby Flowers: Black, Orange & Purple (bought these online)
Halloween Decor, I a spider web
approx 50 Skinny metal push pins
Over the door wreath holder

Directions:

Use newspapers or brown bags to cover surface you are working on, burlap shreds a lot and can cause a mess.  Start by wrapping the wreath (i bought a straw one and did not remove the plastic on it) wreath with the burlap using the push pins to keep it down.  I wrapped it around twice to get a nice thickness to the wreath.

Once you are satisfied with the thickness, start attaching the  shabby flowers to the wreath using the pins.  I started with the orange ones and did two rows of them.  I then took all the black ones and started adding them all over the wreath! The silver pins actually gave it a little sparkle.


Lastly, add the decor, I bought a small spider web with a purple spider to it, I also attached it on the orange shabby flowers.  I had a few purple shabbies that I added on the black just to bring in some color, or leave it as is if you choose not to add the purple (i think i liked it without).


I thought it was interesting how the wreath looked different on a brown door compared to a white door! It's the same wreath, Hope you guys enjoy creating this, I thought it came out slick and modern!

Friday, August 10, 2012

Slow Cooker Chicken Marrakesh

Ingredients

  • 1/2 onion, sliced
  • 1 clove garlic, minced
  • 1 large potatoes, peeled and diced
  • 1/2 (15 ounce) can garbanzo beans, drained and rinsed
  • 4 chicken thighs
  • 1 teaspoon ground cumin
  • 1 teaspoon ground cinnamon
  • 1 teaspoon red chilli powder
  • 1/4 teaspoon ground black pepper
  • 1/2 teaspoon dried parsley
  • 1 teaspoon salt
  • 1 small can diced tomatoes

Directions

  1. Place the onion, garlic, potatoes, garbanzo beans, and chicken thighs into a slow cooker. In a bowl, mix the cumin, cinnamon, red chilli powder, black pepper, parsley, and salt, and sprinkle over the chicken and vegetables. Pour in the tomatoes, and stir to combine.
  2. Cover the cooker, set to High, and cook until the potatoes are tender and the sauce has thickened, 4.5 hours
  3. Squeeze fresh lemon on top, serve with white or brown rice.  
 Note: I take no credit for coming up with this recipe, I only made variations it to my taste.  Please follow this link for complete details of this recipe.
 

Wednesday, July 11, 2012

Personalized DIY Wreath

We created this wreath for my daughter's 1st birthday and used pinks and blues to bring in the colors of the theme we were using for the party.  It was easy to make and we got great compliments. 

Cost: $15
Time: 20 Mins

You will need (I bought everything at Michaels):
1 Styrofoam Wreath
1 Burlap
Small Letters
Fabric Flowers
Grosgrain Ribbon
Scissors
Penclil
Ruler
Glue Dots
20-25 Skinny metal push pins
Over the door wreath holder
1 8x11 sheet construction paper, solid or patterned

Directions:

Cut 6 small triangles from the construction paper based on how big you want the banner on to the wreath.  Use glue dots to attach the triangles you cut to the ribbon.  You don't necessarily have to put two rows of banners on like I did.

Use newspapers or brown bags to cover surface you are working on, burlap shreds a lot and can cause a mess.  Start by wrapping the styrofoam wreath with the burlap using the push pins to keep it down.  We wrapped it around 3 times to get a nice thickness to the wreath.

Once you are satisfied with the thickness, attach the fabric flowers to the wreath using the pins.  Next, attach the triangle banners on the ribbon to the wreath leaving enough room on top for the letters, you can use smaller letters if the name you are using is more than 4 letters.  Alternatively you can use just one banner to leave enough room for the letters on top for longer names.

Lastly, cut out a large piece of ribbon to attach the wreath to the holder (blue ribbon in image below).  Attacking the ribbon first will give you a good idea on how to space the letters on top to spell out the name you'd like to use. 


I was inspired to make this by the many DIY wreaths on pinterest and without the help of my friend Meghan, I would not have been able to create this amazing wreath.

Wednesday, June 27, 2012

Greek Panzanella

Serves: 6  
Cooking Time (approx.): 45 mins

Good olive oil
1 small Italian bread or boule, cut into 1-inch cubes (6 cups)
Kosher salt
1 hothouse cucumber, unpeeled, seeded, and sliced 1/4-inch thick
1 red bell pepper, large diced
1 yellow bell pepper, large diced
1 pint cherry or grape tomatoes, halved
1/2 red onion, sliced in half rounds
1/2 pound feta cheese, cut in 1/2-inch cubes

For the vinaigrette:

2 cloves garlic, minced
1 teaspoon dried oregano
1/2 teaspoon Dijon mustard
2 tablespoons Basalmic Viniger1 teaspoon salt
1/2 teaspoon freshly ground black pepper
3 tablespoons good olive oil
Heat 2 tablespoons olive oil in a large saute pan. Add the bread cubes and sprinkle with salt; cook over low to medium heat, tossing frequently, for 5 to 10 minutes, until nicely browned. Add more olive oil as needed.

Place the cucumber, red pepper, yellow pepper, tomatoes and red onion in a large bowl.

For the vinaigrette, whisk together the garlic, oregano, mustard, vinegar, 1 teaspoon salt and the pepper in a small bowl. While still whisking, add the olive oil and make an emulsion. Pour the vinaigrette over the vegetables. Add the feta, olives and bread cubes and mix together lightly. Set in refrigerator for 30 minutes for the flavors to blend. Serve at room temperature.

Note: I take no credit for coming up with this recipe, I only tweaked it to my taste.  Please follow this link for complete details of this recipe on Food Network.

Monday, June 11, 2012

Stri Fry Lime Chicken - Healthy and Delicious


 Serves: 2
Cooking Time (approx.): 45 mins
1.5 boneless chicken breast
*spicy lime marinade
6oz. baby spinach
1 yellow pepper (cut in strips)
1 red pepper (cut in strips)
2-3 cherry peppers (hot or mild- seeded and cut up), you can also substitute jalapeno peppers
1 Tbsp EVOO (Extra Virgin Olive Oil)

*marinade: in mixing bowl- 3 T fresh lime juice, 3T EVOO, 1T chili powder, 1/4t kosher salt (I double this!!)

Marinate chicken for 30 minutes or more at room temperature. Drain chicken, reserve liquid. In skillet, heat EVOO over high heat; fry chicken for 4 minutes or until tender. Add reserved marinade (scrape sides of bowl- you'll lose a lot of spices on sides of bowl when you drain chicken) to chicken, add peppers and cook until peppers tender. Add spinach till it wilts. Toss all together and serve alone or with brown rice.

** I always add extra chili powder and salt

I do not take credit for coming up with the recipe, this recipe was shared by one of my dear friends.

Wednesday, May 30, 2012

Delicious Recipes..Indian Green Chicken Curry

I have been remiss in blogging and I did promise to do this more so here goes. I am going to try and post recipes once a week....I love to cook and bake so I am excited to be doing this!!

As most of you know I am of Indian origin. On one of our visits to Washington DC, we had dinner at this delicious Indian restaurant called Rasika - they make the most delicious Indian Green Chicken Curry I have ever had! Of course my husband has been craving it since and so I went online looking for something similar and found the recipe below which is pretty much dead on to the one at Rasika! Try it out, it's easy to make and most of the ingredients should be available at your local grocery store.  Also PLEASE let me know how it goes once you do make it...I would love to hear your experience and about any variations you made to it.

Serves: 4
Cooking time (approx.): 37 minutes

8  medium sized pieces (about 800  grams) of chicken
2  medium onion(s) chopped
1  cup(s) each of fresh coriander and mint leaves chopped (loosely packed)
4  green chillies
2  teaspoon(s) each of ginger, garlic pastes
1  teaspoon(s) each of cumin and garam masala powders (available at most grocery stores)
4  teaspoons lemon juice
salt to taste
  1. Grind the coriander and mint leaves along with the chopped onions, green chillies and lemon juice, ginger-garlic pastes, garam masala and cumin powders to make a green paste.
  2. Add the green paste in a pot and fry on medium level for about 5  minutes or till the paste is a pale green.
  3. Add the chicken and sprinkle salt to taste. Mix well. Cover and cook on low heat for about 30  minutes or till the chicken is tenderized.
    TIP:
  • The green paste can be made from any combination of green leafy vegetables like spinach, dill, fenugreek, basil, oregano, parsely along with fresh coriander.
Serve hot with: White rice or Naan (available at most grocery stores).

I have made variations to this recipe but I do not take credit for coming up with the original recipe.  You can find the details on the original recipe here.

Wednesday, February 1, 2012

Valentines Day

Valentine's Day is less than two weeks away! I thought I would share some links to some amazing blogs about free printables, and delicious recipes.

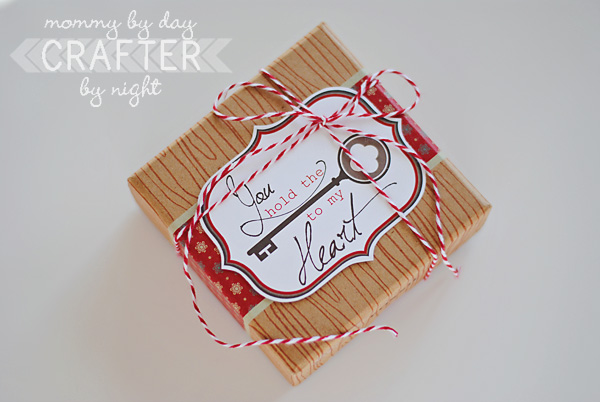
Below is the link from Skip to my Lou for a really cute "You hold the key to my Heart" printable

Hi! My name is Ashley, and I blog over at Mommy By Day Crafter By Night. I love to craft and sew when my two kids go to bed each night... and then I blog about the things I make. I am so excited to be here at Skip to my Lou to share a fun Valentine gift idea with a free printable to go with it!

I came up with this idea because I was trying to think of something cute my my girls to send for Valentines Day to their aunt who is living in Tennessee right now. I love keys, so when I saw these key necklaces I thought it would be cute to send one with a gift tag that said "You Hold the Key to my Heart" tied onto it. 
I found the gold one with the bangles on it at Forever 21 ($5), the brass looking one at American Eagle ($17), and the silver looking one at American Eagle ($15).
I used some bakers twine (maraschino color) to tie the tag onto the necklace. Super simple- but I love the way it looks. I can't wait to send it to her! 
I am doing the 14 days of Valentines for my husband this year and I was trying to think of a way that I could use this tag for him (since the key necklace obviously doesn't work for him;) so I decided to just tie the tag onto his keys and it will just be a little extra reminder that will hopefully make him smile as he heads out the door in the morning:)

Your gift doesn't necessarily have to be anything "key" related- you could totally just tie this tag onto anything and it would work just fine... I love the way it looks tied with the twine on this cute gift box!
I am sharing this fun printable with you all today!
To print the tags, click on the "Download Here" link.
Thanks so much for letting me share this idea with you all! Feel free to stop by and say hi- I have lots of fun tutorials and free printables to share on my blog!!
xoxo, Ashley


------------------------------------
This blog post is credited entirely to AshleyDesigns by Meghna does not take any credit or liability for the above information.